Assembling
A computer is made up of a case, also called a chassis, which houses several internal components, and the external components, including peripherals.
Inside the case go the following internal parts:
Power Supply/PSU – power supply unit, converts outlet power, which is alternating current (AC), to direct current (DC), which is what the internal components require, as well as providing appropriate voltages and currents for the various internal components.
Motherboard/mainboard – As the name indicates, this is the electronic centerpiece of the computer, everything else connects to the motherboard.
Processor/CPU – central processing unit, the "brain" of the computer, most actual computation takes place here.
RAM – random access memory, the "short-term memory" of a computer, used by the CPU to store program instructions and data upon which it is currently operating. Data in RAM is lost when the computer is powered off, thus necessitating a hard drive.
Hard Drive/Hard Disk – the "long-term memory" of the computer, used for persistent storage – i.e. the things stored on it remain even when the computer is powered down. The operating system, and all your programs and data are stored here.
Optical Drive – device for reading/writing optical disks. May read CDs, DVDs, or other optical media, depending on the type. It is essential for installing many operating systems and programs. It may be able to write some of these discs, as well. Some people like to have two such drives for copying disks.
Video Card/Graphics Card/GPU – does processing relating to video output. Some motherboards have an "onboard" GPU built in so you don’t need (but may add) a separate video card. Otherwise, you will need a video card. These plug into a slot on the motherboard and provide a place to connect a monitor to your computer.
On top of the internal components listed above, you will also need these external components:
Keyboard – for typing on. Many motherboards won't even boot without a keyboard attached.
Mouse – for pointing and clicking. Unless you chose a text-based operating system, you will likely want one of these.
Monitor – This is where the pretty pictures go. They come in many forms, the most common being CRT and LCD.
These are the parts that a standard PC will use. We are not considering such esoterica as headless, touchscreen, or voice-controlled systems. You might want to make a check list (perhaps using a spreadsheet) of parts to use as you go about your process of research and selection. That way you won’t find yourself sitting down with a pile of brand new hardware only to find that you forgot an essential component.
Before you jump onto the web and start spending lots of money on expensive computer parts, there are three important questions you should answer which will guide your purchases:
What will be the main function of the computer?
What useful parts do you have on hand, from an old computer or otherwise?
How much can you afford to spend on the system.
Now that you have selected your parts, you get to what is arguably the most fun part of the process: putting the parts together.
head (cross-shaped) screwdriver
Needlenose pliers
Anti-static Wrist Strap
A large level working space
Optional, but useful tools
Some other tools and equipment can come in handy as well, such as:
Grounding Mat or anti-static carpet
Spring action parts grabber.
Electrical tape
Flashlight
A second, working computer to swap parts, look for tips, ask for help online, download drivers and patches, etc. - very useful
A can of compressed air - useful when working with older parts that have collected dust. A better alternative but also more costly, is a vacuum cleaner designed for cleaning electronics.
If you do not have access to an anti-static mat or wrist-band, when working on a table rubber or leather-soled shoes can help prevent static charges obtained from walking around, although if you move your hands upon the ground, say picking up a dropped screw, your static charge WILL stay with you until you touch something metal. Therefore, after doing anything that might have potentially caused you to pick up a static charge, ground yourself on an unpainted surface of the computer case before touching anything electronic.
Preparation
Proper preparation is the key to a successful build. Before you begin, make sure you have all the tools you will need, and secure a clear, well-lit workspace. Gather all the components you’ll be using and unpack them one at a time, verifying that everything that is supposed to be there is actually present. At this point you should leave the parts themselves in their protective anti-static bags, and assemble all the accompanying manuals. Now I know you want to get started, but trust me, read the manuals, check the diagrams, make sure you understand where each part goes and how it attaches. If there is anything you don’t understand, now is the time to do a little extra internet research or call the manufacturer with your questions.
Find a dry, well-ventilated place to do your work. You should have plenty of light to see your components with, and if possible, you should choose an area without carpet on the floor, as carpet tends to generate a lot of static, and this can be ameliorated by choosing a nonconductive floor surface. An unfurnished basement is a good work location.
Safety precautions
Static electricity is the biggest danger to the expensive parts you are about assemble, even a tiny shock, much too small for you to feel, can damage or ruin the delicate electronic traces, many times smaller than a human hair, that make up your CPU, RAM and other chips. It’s important to use your anti-static wrist strap. Once you have the powersupply installed in the case, clip the end of the wrist strap to the outside of the powersupply. (Never plug your computer in while you are connected to it by a wrist strap.) This will ensure that you, the case and the power supply are all connected to a common ground, in other words there will be no inequality of charge that will allow a spark to jump from you to the case. It’s also helpful to have an antistatic mat to set the case and other components on.
Nobody but you is at fault if you shock your components with static electricity. Make sure that you take the precautions in the previous paragraph to ground yourself from static electricity. (Note: if you really must work on a computer and haven't got proper anti-static equipment, it is usually OK if you make sure that you don't move about much; are not wearing any static-prone clothing; handle components by the edges; and regularly (once a minute or so), touch a grounded object.). The case metal of your PC's power supply will usually be a suitable grounded object. As noted above, touch it every few minutes while you are working on your PC if you haven’t got a wrist strap.
Turn off your computer and switch off your Power Supply at the wall before installing or removing any components - if power is flowing to components as they are installed or removed, they can be seriously damaged. In order to have a computer earthed, you need it plugged in at the wall but turned off at the power supply and at the wall.
Never cut the grounding pin off your power cord. This "safety ground" stands between you and potentially lethal voltages inside the power supply.
Be wary of sharp edges! Many lower-end PC cases have sharp, unfinished edges. This is especially so on interior surfaces, and where the case has been cut or punched-out. Use care and take your time to avoid cutting your hands.If your case has this problem, a little time with some sandpaper before you begin construction can spare you a lot of pain.
Dismantling discrete electronic components such as your Power Supply or Monitor is dangerous. They contain high voltage capacitors, which can cause a severe electric shock if you touch them. These hold a charge even when the unit is not plugged in and are capable of delivering a fatal shock.
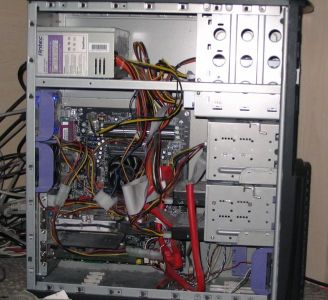
Construction
Start by putting your case down on your work surface, with the case door facing up, and open the case.
Motherboard
Find the motherboard standoffs that should have come with the case. They are screws, usually brass, with large hexagonal heads that are tapped so you can fasten screws into the top.
Remove the I/O Shield from the back of the case where the ports on the back of the motherboard will fit, and put in the I/O Shield that came with your motherboard. There may be small metal tabs on the inside of this face plate, if so you may have to adjust them to accommodate the ports on the back of the motherboard.
Some case styles make it difficult to install the motherboard or the CPU with the power supply installed. If the power supply is in your way, take it out and set it aside (we'll put it back in later).
Now locate the screw holes on your motherboard and find the corresponding holes on the motherboard plate (or tray) in the case. Put a standoff in each of these holes on the tray and position the motherboard so that you can see the holes in the top of the standoffs through the screw holes in the motherboard.
Now is the time to make sure the ports on the motherboard are mating with the backplate you just installed, and make any necessary adjustments. The small metal tabs are intended to make contact with the metal parts of the connections on the back of the motherboard and ground them, but you may have to bend these tabs a bit to get the ports all properly mounted, this is where those needlenose pliers may come in handy.
If you have trouble lining up the screw holes, double check that you have the standoffs in the proper holes on the tray. With lower quality cases there are sometimes alignment problems and you may have to forgo one or two screws. If this is the case, make sure you remove the corresponding standoffs.
Now fasten a screw through each of the motherboard screw holes into the standoffs underneath. These screws should be snug but not tight, there is no reason to torque down on them, hand tight is fine, otherwise you can damage the motherboard.
There, the motherboard is in, now it's time to plug the other components.
CPU
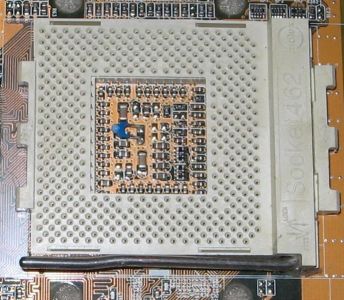
as An example of a CPU socket, Socket A
Installing the CPU, and the CPU’s heatsink and fan, are by far the most difficult steps you’ll have to complete during your build. Here, more than anywhere else, it will pay to read the instructions carefully, look at the parts, study the diagrams that came with your CPU and/or third party cooling solution, and make sure you thoroughly understand what you are going to do before you try to do it. During the process, if anything does not seem to fit or make sense, put the parts down and look things over carefully before you proceed. Some operations, especially installing the heatsink/fan combination, can require pretty firm pressure, so don’t be afraid to push a little harder if you’re sure everything is set up correctly.
The details of the installation process differ in slight but important ways for each manufacturer’s processors, and even within a manufacturers product line. Therefore, for these details, you should rely on the instructions that are provided with the CPU.
The two things that go wrong the most often and most expensively (minimum of a killed CPU, sometimes more) in building one's own computer are both related to the CPU and its cooler:
Switching the computer on "just to see if it works" before adding any CPU cooling unit. Without cooling, CPUs heat up at extreme rates (a CPU heats up anywhere between ten times and a thousand times as fast as a cooking area on your stove!) By the time you see the first display on the screen, your CPU will already be severely overheating and might be damaged beyond repair.
Mounting the CPU cooler improperly. Read the instructions that came with your CPU and cooler very carefully and ensure you are using all components in the correct order and correct place.
If you buy a third party cooling solution for your CPU make sure you get one that is compatible with the CPU you have. Most brands come with multiple mounting brackets that will suit many different chipsets, but it's best to check for compatibility just in case.
If using thermal paste, apply it only to the CPU die (the square piece of silicon in the middle of the CPU) and do so sparingly -- most modern CPUs take no more than a grain of rice sized dab of thermal paste. Some people do like to wipe some onto the heatsink's surface and then wipe it smoothly off so that bits of it may get into tiny holes for better heat transfer. See Arctic Silver Instructions for more info on how to apply and remove thermal paste/grease. (It was written to be specifically for Arctic Silver paste, but the same techniques can be applied to other brands of thermal paste.)
If using a thermal pad supplied with your cooler, make sure you remove any protective tape from the die just before installing and do not get it dirty - and do not combine thermal pads with thermal paste, it's either one or the other. Then, check that you install the cooler in the right orientation and that you set it flat on the CPU die without exerting undue pressure on any edges or corners - the latter can make small pieces of the die break off, killing the CPU.
One option you may consider, before installing the heatsink, is to "lap" the heatsink, which means to smooth out the bottom surface. To do this, you will need a very flat surface; a piece of thick window glass will work. Fasten your sandpaper on the flat surface, invert the heatsink on the sandpaper and sand in small circles, applying minimum pressure. Check frequently and when you see a uniform pattern of scratches, switch to finer grained sandpaper (the numbers go up as the sandpaper is finer, so something such as 220 is coarse while 2000 will be very fine.) Remember that you are not trying to remove any material, just polish out surface irregularities. If you get it right, you should have a surface which feels completely smooth to the touch (but don’t touch it, the oil in your fingers can cause corrosion of the fresh surface) with a mirror finish. Some companies producing heatsinks lap the surface themselves, so if the surface already looks like a perfect mirror, leave it alone. A lapped heatsink is more effective as it will have better surface contact with the chip.
Tighten the cooler using only the specified holding devices - if you did everything right, they will fit. If they don't fit, check your setup - most likely something is wrong. After mounting the cooler, connect any power cables for the fan that is attached onto the cooler.
As an aside to the instructions above, it has been my personal experience that fitting the CPU and heat sink is best done on a supportive surface (a telephone directory on a table in my case) prior to installation, to avoid excessive flexing of the motherboard.
If you've got the CPU and its cooler installed, and the motherboard in the case, you’re over the hump, there just a few more easy pieces to go before that momentous first power-up.
RAM
aNext, you will need to install your RAM (random access memory). Find the RAM slots on your motherboard; they will look something like the picture above. To install the RAM modules, first push on the levers (white plastic in the picture) on either side of the DIMM socket, so that they move to the sides. Do not force them, they should move fairly easily.
Put the RAM module in the socket. Line up the notch in the center of the module with the small bump in the center of the RAM socket, making sure to insert it the right way. Push down on the module until both levers move up into the notches on the sides of the module. There should be a small "snap" when the module is fully seated. Although this does require a fair bit of force, don't over do it or you may break the RAM module.
Take a good look at your seated RAM, if one side seems to be higher than the other, odds are it's improperly seated - take it out and try again. As you handle the RAM, try not to touch the copper stripes you can see along the bottom edge, as doing so is the best way to damage the part.
Start adding RAM at the slot labeled "Bank 0" or "DIMM 1". If you don't have a stick in "Bank 0" or "DIMM 1" the system will think there is no RAM and won't boot.
On newer motherboards with 4 slots, you'll see alternating colours. For example, slot 1 is blue, slot 2 is black, slot 3 is blue, slot 4 is black.
If you were to put 1 gigabyte of RAM in your PC, it's best to use dual channel 512MBx2 sticks. Put the first 512MB stick in slot 1, and put the 2nd stick in slot 3 (the two slots that are blue) - leaving slot 2 empty. This will give you better performance, vs. putting 1GB in slot 1, or two 512MB sticks in slot 1 and 2.
Power supply
Installing your power supply is pretty straightforward, if it came with your case it was preinstalled and if you took it out earlier to get the motherboard in, now is the time to put it back. Otherwise a few moments of screwdriver work will get the job done. Generally there will be a bracket on the top of the case where the power supply is mounted and a few screws used to fix it in place. Some cases place the PS differently, see the documentation that came with yours.
Some power supplies come with modular cables, so you can plug in only those you’ll be using, now is a good time to figure out what you’ll need and plug them in. Other power supplies have all the cables hardwired in, you’ll want to separate out the ones you’ll need and neatly coil the remainder somewhere out of the way.
If your power supply has a switch to select 115v or 220v make sure it is set properly, this is important. Many newer power supplies can automatically select and don’t have such a switch.
Once you get the power supply installed you should plug the main power, a 20 or 24 pin plug, into the motherboard. There may also be an additional four or eight pin power lead on the motherboard that needs to be plugged in, this is usually located near the processor socket. Make sure you check the motherboard documentation carefully for the location of the power sockets.
Video card
If your motherboard has a built-in video adapter you want to use, skip this section.
If you have an AGP video card: Install the video card into the AGP socket. This is always the top expansion slot near the back of the computer. AGP slots are often brown, but can also be strange colours such as fluorescent green. Check the motherboard for levers (or similar devices) that are part of the AGP slot to help hold the card in place. These must be retracted before insertion of the card. Check the motherboard's manual for information on how to use these devices (if your motherboard has one.) Push the card into the socket (AGP slots are often pretty tight, don't be afraid to push it until it's well inserted), then screw it in at the top of the metal bracket. If it has a power connector, connect it to a 4-pin molex connector. If it has a pass through, do not connect it to a hard drive.
If you have a PCI Express video card, install it the same way as an AGP video card, however the slot where it goes looks a little different having an extra spot on the slot as opposed to the 2 slot parts on an AGP slot. PCI Express slots used for video cards are commonly 16x as opposed to AGP 8x.
When your card is properly installed the line formed by the top of the card will be exactly parallel to the motherboard, if one side seems to be higher than the other, chances are that it's not fully inserted, press a little harder on the high side or pull it out and try again.
Installing drive jumpers
If you are using SATA drives there is no need to adjust jumpers -- you can skip this section.
Before you install IDE/ATA (PATA) drives, you will need to set the drives jumpers. Each IDE/ATA channel can handle two drives, a master and a slave. Consult your drive's instructions on how to set the jumpers. The jumper configurations are usually either printed on the back, or on the top of the drive. Drives can be configured in 2 ways: Drive Select or Cable Select.
"Cable select": Use this if you have 80-pin cables. Cable select automatically assigns slave/master based on the plug on the IDE cable the drive is plugged into. Put the jumper on CS.
"Drive select": If you are using a 40 pin cable, you must use "drive select". Master/slave status is determined by the jumper. In this mode, configure the drive on the end connector the master, and drive connected to the middle connector the slave. If the IDE channel has only one drive, check your motherboard documentation for the appropriate setting, which is usually master.
Note that Drive Select will always work, while Cable Select will only work if you have the proper cable.
Installing drives
Next install the hard drive and optical drives.
How a drive is physically installed will depend on the case.
When using an IDE cable, plug the two connectors that are closer together into the 2 drives, and the third to the controller or motherboard. The connector furthest from the board should be attached to the drive set as Master. Make sure the drive that you will install your OS on is the primary master. This is the master drive on the Primary IDE bus which is usually the IDE 40 pin port on the motherboard labeled “Primary� or “IDE 1�..
Note: IDE connectors are keyed, so it should be impossible to insert them backwards. However, it doesn't require very much force to do this and it can destroy your motherboard . Look carefully at the drive and the cable connection before you try to connect them. You should see a "missing" pin on the drive, and a corresponding blocked socket on the connector. If you break a pin on the drive, you will probably have a worthless drive.
Note: most parallel IDE cables have a colored stripe down one side. That coloured stripe signifies "pin 1" - and usually will line up next to the molex power connection on your drive. Use this rule of thumb if your connectors aren't keyed.
Next, plug a 4 pin molex power connector into each hard drive and optical drive. If you are installing the power connector to a SATA drive, some drives have the option of using either the SATA power connector (a flat about 1" wide connector) or the standard molex connector; use one or the other, not both. Connecting both can break your hard drive. For better data transfer, you can purchase heat-protected high-end data cables at your nearest electronics store.
ad Floppy Disk Drive Cable :
If you install a floppy disk drive, the cable is very similar to the IDE cable, but with fewer wires, and a strange little twist in the middle. Floppy drives do not have master/slave configurations. The floppy disk connector is not usually keyed, making it all too easy to plug it in the wrong way! One wire in the IDE cable will be colored differently: this is pin 1. There is usually some indication on the floppy drive as to which side this is. The power plug for a floppy is 4 pins in a line, but rather smaller than the standard hard drive power connector. Plug the end of the cable with the twist into the floppy drive ("drive A:"). Plug the other end of the floppy ribbon cable into the motherboard. If you install a second floppy drives, plug the middle connector into "drive B:". The twist between drive A: (on the end) and drive B (in the middle) helps the computer distinguish between them.
Other connections
In order to turn the computer on, you’ll need to connect the power button and while you're at it, you might as well do the reset buttons and front panel lights as well. There will be a set of pins, usually near the front of the motherboard to which you will attach the cables that should have been supplied with the motherboard. (Sometimes there are cables already connected to the case, use them if they are there). These will plug into the front of the case. The plugs in the front of the case will be labeled. The pins on the motherboard may be labeled as well, but they can be difficult to read because the print is very small. The documentation that came with your case and motherboard should tell where these connectors are. The front panel LEDs are polarized: usually the positive wire is white.
In addition, you can connect any case-specific ports if they are supported by the motherboard. Many cases have front mounted USB, firewire and/or sound ports.
Prepare for power up
Some people will put power to a system several times during assembly and for experienced builders this may serve some purpose. For first timers though, it’s best to assemble a minimal complete system before powering up. Minimal because that way there are comparatively few potential sources of trouble, complete so that you can test everything at once and because the fewer times you have to put power to an open machine, the better..
If you’ve been working along with us you should now have such a minimal system put together. Briefly this includes a case with a motherboard in it, a processor (and its cooling unit) and some RAM plugged into the motherboard, hard and floppy drives installed, and some kind of video available. If your motherboard has built-in video, you might want to use that for this first try, even if you are going to install a video card later.
For this test, you’ll want to have the computer open, so that you can see all of the fans, and you’ll need to connect a monitor and a keyboard and a mouse (OK, you don’t really need the mouse . . .)
asdComparison of VGA and DVI :
Monitors will either have a VGA or a newer DVI plug (see picture, as they are a lot less apparent than PS/2 / USB comparision). Most monitors use VGA connectors, and so most graphics cards have VGA output. If you have one type of plug and the graphics card has another, you can easily buy an adapter. Some cards even come with one.
There are two standard connectors for mice and keyboards; PS/2 connectors and the more modern USB connectors. Plug the mouse and keyboard in the appropriate slot.
Note: If you intend to install an operating system from a boot CD or floppy, or modify bios settings you will need to use either a PS/2 keyboard, a USB to PS/2 converter, or a motherboard that supports USB devices. Otherwise your keyboard will not work until the operating system has loaded USB drivers.
Once you have this all set up, it’s time to double check, then triple check that you have made all the necessary connections and that you haven’t left any foreign objects (where’s that screwdriver?) in the case.
Power up
The moment of truth now approaches, time to take a deep breath, exhale slowly, then take a moment to check one more time that everything is as it should be. Make sure you've removed your wrist strap, turn on the monitor, then press the power button, and observe the inside of the open machine. (Do not touch any part of the inside of the machine while it is powered up – you will NOT die but your computer may break.) The first thing to look for is that the CPU cooler fan spins up, if it does not, cut the power immediately. This fan should start up right away; something is wrong if it doesn’t and your CPU is in danger of overheating so stop now and troubleshoot.
If the CPU fan spins up, check that all the other fans that should be spinning – case fans and fans on the power supply and video card (if installed) are also spinning. Some of these fans may not spin up until a temperature threshold is passed, check your documentation if anything is not spinning.
If the fans spin, you can turn your attention to the monitor, what you are hoping to see is the motherboard’s splashscreen, usually featuring the manufacturer’s logo. If you see this, take a moment to bask in the glow, you’ve built a computer!
If this happy event does not occur, if smoke appears, or if the computer doesn't do anything, unplug the power cord immediately and check the steps above to make sure you haven't missed anything. Give special attention to the cables and power connections. If the computer does appear to come on, but, you hear beeps, listen carefully to the beeps, turn the computer off, and refer to your motherboard's manual for the meaning of the beeps. Some boards have an optional diagnostic device, usually a collection of LEDs, which when properly plugged in will inform you of the nature of the problem. Instructions for installing this as well as the meaning of its display should be in the manual for the motherboard. If the computer turns on but the only thing that comes on is your power supply, turn it off. This probably means something is shorted, and leaving it on could damage the parts.
If all is well it's time to turn the computer off, and close it up. Then you may want to turn it on again and set certain options in the Computer's BIOS (usually by pressing 'F1' or 'Del' a few seconds after boot.) These options will be explained in the motherboard manual. In general, the default options are OK, but you may wish to set the computer's hardware clock to the correct time and date. The BIOS is also where you determine the default boot order of the system, typically Floppy, then CD-ROM, then Hard Disc.
If you want a further quick test, before you install an operating system, you may find a bootable CD-ROM such as Knoppix extremely useful.